Followers

Saturday, August 24, 2019

With Talon and Claw for the Great Northern War


With Talon and Claw is Mr Barry Hilton’s Great Northern War (GNW) supplement for use with the War of Three Kings.  As you would expect from the League of Augsburg stable the production values are first rate.  Like the War of Three Kings it’s a sturdy hardback book.

The aim of the book is to provide all of the all the information necessary to game the Great Northern War and it succeeds admirably.  The War of Three Kings already provides for Russians and Swedes, indeed if you hit the GNW tag I’ve written a blog on just that topic. There is some new stuff for both Russians and Swedes in this latest volume.


Mr Hilton’s main challenge was to accommodate the very different military system of the East (which in this period begins in Poland) within the confines of the primarily Williamite War based War of Three Kings. He does so by use of special rules, pretty much as special rules were needed to cater for the Highland Charge. I’ve yet to try the new additional rules out on the table top but reading them I think all should run smoothly enough.  In short, nothing seems obtrusive rather the parameters of the rule set are seamlessly expanded to take in a new theatre. No mean achievement in my view. 


As well as the new rules you get a primer chapter on each of the major combatants dealing with activity, tactical doctrine, troop and command quality. 


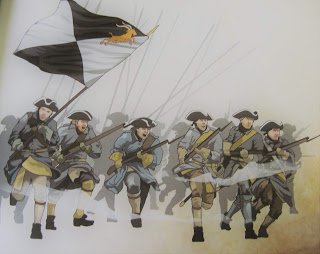
This is followed by heavily illustrated uniform and flag sections for each of the combatants.  


I should add the Cretan War between the Ottomans and Venetian Republic is included.


The final part of the book is given over to a Russian versus Swede After Action Report (AAR) to show us how the rules work. It does this very well and the text and photos are inspiring.  I like a game to capture the uncertainty of war and to tell a good story.  On the evidence of the AAR With Talon and Claw delivers both very well.

This book was written with War of Three Kings rules in mind yet the information within could serve well in any modular rule set say, Black Powder or Piquet.  The technical information, uniform and flag details will gratify anyone interested in the period.

Thursday, August 22, 2019

Justinian’s Wars


I’ve been interested in the Roman reconquest of the West since a boyhood reading of Count Belisarius by Robert Graves.  Many years later Montvert Press published Roy Boss’s wonderfully illustrated book Justinian's Wars.  It was packed with interesting information and informed analysis and so I invested in the necessary figures.  Alas what I bought in terms of Byzantines failed to inspire and the project failed due to my disappointment.  On the plus side I was happy enough with my Goths and sundry other Germanics and Huns.

Peter Heather’s latest book Rome Resurgent re lit the flame and I realised there were some fine Byzantines to be had.  Indeed, mostly there always had been I’d simply bought the wrong ones. So, older and wiser I got stuck in again and made a start.

First, I needed some Roman heavy cavalry archers and Old Glory sell good ones.  Here they are.


I struggled to find figures I liked for the elite Bukelarii cavalry that provided the battle wining edge to Justinian's armies.  Eventually, I settled on these from Khurasan you might note that some of them are drawing their bows.  


I think that is a nice touch by the designer.


I also needed some heavy infantry.  These ones are from Donnington Originals and I like them immensely. 


The supporting archers are Minifigs that have lain neglected for decades.


The next pic is a mystery to me I have no idea who made these figures.  I’ll field them as medium infantry.


In the wreckage of the abandoned project I located some dismounted Lombard nobles sculpted by the talented Steve Shaw.  I have enough for a full unit.  Dismounted Lombard nobles were once a staple of Belisarian Army lists but were purged in a subsequent revision.  Peter Heather locates them in the battle line and that's good enough for me.


More to follow soon but I feel a good start has been made.  Belisarius will ride again or perhaps in my case more accurately  -at last.

Thursday, August 15, 2019

Sikh Wars-Bloody Bhudowal-Part 2


If you have been following this series of articles you will know what happened at the Battle of Bhudowal and in my game based on that encounter.  You will also know that General Harry Smith did consider storming the Sikh position.

As it happened, he thought twice about it and didn’t fancy his chances.  Armed by hindsight and the insights provided by the Bhudowal game I think he made the correct decision.  

In this game General Smith doesn’t think again and goes on the attack.  The question arises how would he have done that?  I think he would have favoured either a double or single envelopment of the Sikh line.  Let’s see how it turns out. 

  
The forces are the same as in the last game and the British battle plan is as follows:

The baggage Train has been left unguarded.

The two British cavalry units are brigaded together under Brigadier Oates and tasked with turning the Sikh left flank.

General Smith will command a brigade consisting of HM 53rd, 47th BNI and the Foot and Horse artillery.  He will storm the Sikh Batteries.

Brigadier Gough will lead HM 31st and the BNI 24th and attack the Sikh left flank.

The Sikh deployment is unchanged. 


General Rajodh Singh can see the British forming up and decides to do a little manoeuvring and defeat them in detail.


The first moves are unpromising Some Gorchurra ride out, the Sikh irregulars are busy ignoring their orders and the British are still dressing their lines.  The Generals try again.


The Sikhs now have a line of Gorchurra supported by a Horse Artillery battery to protect their flank.   


The Sikh irregulars have finally grasped what is needed and are facing the right way ready to move off.


The British are on the move horse, foot and guns.  Timing for both sides is going to be tricky.


General Smith sees the movement behind the Sikh entrenchments concludes the Sikh irregulars are going to try and turn his flank he needs to beat them to the punch.  He also needs his cavalry to ride down and scatter the Gorchurra.  The British are now in range but the Sikh cannon are ominously silent.


More Gorchurra burst from the glade and ride up the Sikh line parallel with the British cavalry brigade.  Brigadier Oates orders his squadrons into line he is outnumbered 2 to 1 so flank attacks might have to wait a while.


Sikh irregulars now line the glade with more arriving every moment.


General Smith has his cannon deployed.


His attack columns formed.  


The Sikh guns open up.


The British heaviest artillery are silenced and the Bengal Horse artillery also take a pounding.


Smith's brigade marches up to the Khalsa entrenchment and both battalions fire at close range.


To no avail, the well protected Sikh gunners are still in the game.  Smith's brigade draws back, daunted by their appalling dice.


Elsewhere Brigadier Oates is in a desperate melee with the Gorchurra.  


His outnumbered Lancers have driven the Sikh horsemen back once. But, undeterred the Gorchurra returned to the charge.  


The Bengal Irregular cavalry ride to the rescue.


The Bengal Horse Artillery fire at the entrenched Khalsa but do no damage.  

Smith’s brigade volley again and mow down many of the Khalsa gunners.  By return it receives the first fire of the two battalions of Sikh regulars and falls back with losses.


The Bengal cavalry are hit in the flank by the Khalsa guns and fall back with losses.  The Lancers can no longer hold the Gorchurra and are giving ground.


The 53rd receive another volley and retire again.

General Smith has one intact brigade the rest of the army is in poor shape.  To avoid a massacre, he orders a withdrawal.   


In Field of Battle terms, he is out of Army Points.

Smith's plan was defeat the best part of the Sikh Army by deploying a numerical advantage against it.  He intended that each battalion of Khalsa regulars would face two of their British equivalents. That would offset the advantage of entrenchments and once the Khalsa were out of the way the rest of the Sikhs would be easily dealt with.  

He had insufficient forces for the job and was lucky Rajodh Singh let him withdraw. 

In our third and final Bhodowal General Rajodh Singh goes on the offensive.