We left the Williamite Dragoons at the hostile end of the
bridge. Immediately to the west of the
bridge is a bog and it’s full of Rapparees who intend to shoot the Dragoons.


Shooting
The experienced 'Drilled' Rapparees are ‘Loose Order’ troops in two
groups, one of two stands and the other of one, and they open fire using a D8 ‘Signature
Dice’ for each stand. The first group are at ‘Short’ range and the second at ‘Effective’
range.
Neither group will get the ‘First Fire’ bonus as they are
loose order troops but because the first group are at short range they will
double their number of dice . To this they
add:
+1 dice for being an All Musket unit
+1 dice for being armed with Flintlock Musket.
Because the Dragoons are currently a ‘Dense’ target the
Rapparees will re roll any misses.
The first group throw for 6 D8 scoring a 1, 3, 5 and a 6, 7,8. They need a 6 to hit and so get
to re-throw three dice scoring 3,5 and 8.
They have inflicted 4 casualties on the Dragoons.
The second group of Rapparees throw 1 D8 for their single stand and+1 dice for being
an All Musket unit+1 dice for being armed with Flintlock Musket. They don’t double their dice because they are
not at short range but they will re-roll misses.
They throw three D8 scoring 2,4,8 and re -roll two dice scoring two 6s. They have inflicted 3 hits on the Dragoons.
The Dragoons do not return fire because they are not in ‘Line’
and so cannot shoot. They have now lost
1 casualty to artillery and 7 to musketry. They can only absorb 12 casualties (compared to the 18 of a three stand formed battalion of Foot) and now they are unlikely to survive the next 'Check Morale'.

Only infantry using ‘First Fire’ can do this. Otherwise infantry can only shoot OR move.
First fire is deadly if delivered at close range, accordingly it is to be horded like treasure or provoked at the earliest opportunity.


They elect to do so because getting the army across the bridge takes priority. The ‘Wheel’ could take place in the next turn and would reduce their move to 3 inches.
Movement
The bottle neck at the bridge means that we have seen very
little movement from either side so far.

Movement can be variable in BLB and we are about to see a lot of it. Let’s look at a few examples.

Movement can be variable in BLB and we are about to see a lot of it. Let’s look at a few examples.
The deadly Rapparees in the bog wrought havoc and then
moved out of harm’s way. This is because
it was their ‘First Fire’ and though they didn’t get the bonus of going up one
‘Signature Dice’ size they did arrive with carefully loaded muskets. Thus, they
could shoot and move or had they chosen move and shoot.

Only infantry using ‘First Fire’ can do this. Otherwise infantry can only shoot OR move.
First fire is deadly if delivered at close range, accordingly it is to be horded like treasure or provoked at the earliest opportunity.
The Dragoons ‘Morale Check’ and have had
enough and are ‘Shaken’ and ‘Disordered’ and need to ‘Retreat’. This does not require a ‘Move’ order. Here, I may have made a mistake.

The Dragoons could have tried to ‘Retreat’ by pushing through
three squadrons of Horse on a narrow bridge.
I thought that unlikely so I allowed them to ‘Retreat’ to their flank eastern side
of the bridge end.
The Garde Paard cavalry need to get off the bridge fast and
then to wheel east to get out of the way of the squadrons following behind
them. Let’s see how they do it. First, they receive their ’Move’ order and can advance 6
inches as they are in ‘Column of March’.
This will take them off the bridge but will move them closer
to the Jacobite light gun and leave them still presenting as a ‘Dense Target’.

They elect to do so because getting the army across the bridge takes priority. The ‘Wheel’ could take place in the next turn and would reduce their move to 3 inches.
The Jacobite cavalry are keeping a close eye on their
Williamite counter parts and two squadrons are ordered to ‘Move’.
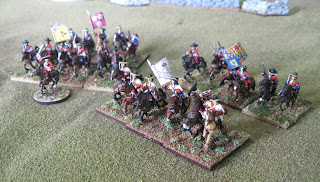
They too have to ‘Wheel’ and as they are already deployed in line of battle will make a half move of 2 inches.

They too have to ‘Wheel’ and as they are already deployed in line of battle will make a half move of 2 inches.

Next time we will look at Movement, Charges and Close Combat starting with a suprise move by the 'Veteran' Garde Paard.
No comments:
Post a Comment